Showing posts with label diy. Show all posts

Monday, March 23, 2015

Bunny Bait Sweet Treat

I love this time of year!
The birds are singing and the flowers are blooming!
Spring is upon us and I have a yummy and easy treat
for you to make with the kids.
 
Bunny Bait!


All you need:
 
 
4 cups of Boom Chicka Pop
(or your favorite kettle corn)
1 cup of pretzels broken into small pieces
1 cup of pastel Easter M&M's
 1 cup of white chocolate melted
Parchment Paper
 
First, lay out a single sheet of parchment paper
Pour your popcorn onto the parchment paper
Next, layer on your pretzels and M&M's


Melt your white chocolate in the microwave
and drizzle over the top!
 
Simply Yummy!
 
Add this sweet Bunny Bait bag topper
and hand out to your friends!


You can find the Bunny Bait tag here!
 
Happy Easter!


Monday, September 12, 2011

Breakfast Push Ups


I have really been loving all of the fun ideas
I find over at Pinterst!

If you have not been able to visit their site
Go NOW!!
RUN!!!

Okay, Okay....I found this sweet new use
for the push up containers that you can
find here!

Cinnamon Roll Push ups!


I never thought to do breakfast!

Find the Tutorial for these over
at Tip Junkie....Another great site!
Also, if you are looking for these little containers,
I have them in my shop!

Here is a BONUS!
With every order in September and October,
I am giving you a set of
Halloween Printable Party Circles FREE!


Just mention you saw this on my blog!


Thursday, September 8, 2011

Juice Box Mummies

Who is ready for Halloween?

I am really getting into the mood with all of the
party inspiration that I am seeing everywhere!

How about these little cuties?

Mummy wrapped juice boxes!

Just wrap up those boxes with white electrical tape
or cheese cloth would work at well.
Add some adhesive backed googly eyes
to the front and poke a hole in the top for the straw!
What a fun idea to serve at a child's
Halloween party or a fun surprise for their lunch boxes!

I am doing this one for sure!!

Tuesday, September 6, 2011

Fun with Burlap

Fall is almost here and I am falling more in love
with decorating with Burlap.

I love the rustic country feel....
Here are a few of my favs:


Thursday, August 18, 2011

Baby Reveal Idea

I love the idea of baby reveal parties!
The fun of cutting open the cake and
seeing the pink or blue cake on the inside.

Well, I saw this idea over at Volume 25 blog
and photgraphy by Kelly Anderson Photography.

A Boxed Balloon Reveal!!
Check out this sweet photo!
I love it!!


How fun would this be?


Wednesday, August 17, 2011

Good Idea: Coffee Cubes

It has been one hot summer here in Texas!
Iced coffee has been a favorite of mine this summer!
Making Iced coffee at home can be fun!

Instead of pouring that last little bit of coffee
down the drain, save it and make cubes out of it!
This works great for tea as well!

Just empty your cooled left over coffee or tea into
an ice cube tray and freeze!
Simple as that!

Now if you are like me and like to do things
a little different, try using different ice molds!

Checkout these coffee bean ice molds!
How fun!


You can find these fun molds at Perpetual Kid.

Monday, August 15, 2011

DIY Stars in Jars

Well, summer is winding down and school is starting
for us next week. 
I was looking through Pinterest last night
for hours...and hours....loving all of the beautiful
and fun ideas and came across this project.

Stars in Jars!


What you need:
Mason Jars
Glow in the Dark Paint
Wooden sticks or small paint brushes

What to do:
Dip your stick or brush in the paint
Splatter inside the jar

That is all!
This would be so fun for my kids rooms
or for a sleep over party craft!

Wednesday, June 1, 2011

Picasso Art Party!

My sweet little girl turned 4 last week and
had been talking about an Art Party for months!

It was the first time to invite classmates over
to her house for a party and she was beaming
with excitement!

I have so many pictures so bare with me
in this super size of a feature!

The little artist were greeted by a
birthday balloon wreath!
So super easy!  You must make one! 


And my Sweet Birthday Girl!
Don't you love that shirt!
The ever fabulous Kristina at Modern Frills never disappoints! 
 They are great shirts! 


The first task for my Mini Picasso's
were to make Picasso Pops!
My daughter's help me smash up colorful candies
and place them into bowls divided by colors.
Each guest made their own lollipops!


I wish I had pictures of the finished product...
however I had my hands full!
(Note to self:  Hire a Photographer!)

After making their Picasso Pops,
each little artist found their art supplies
in the Art Cubby that I set up.


Next, my little artists were off for a little
sand art fun!


After finishing their sand art, they painted
their own Picasso Masterpiece.
The kids were so creative! 
Who needs a little treat?
The kids had a little snack with painting
from these fabulous Kandy Kones


Starving Artist?
Yes, after all of that hard work, it was time to eat!

I kept the table design simple.
A row of colorful pails with matching pinwheels lined the table.
I cut the place mats out of colorful foam sheets
and added the dots to make a painters palette.


I tied up the gable boxes with a tag that
read "Starving Artist" and attached a paint brush
for a little added touch.


After all of that fun and lunch....
it is time for some sweets right?


Raibow Lantern hung above the Sweets Table...


I knew I had to have this ruffled table skirt as soon as
my daughter said "Art Party"!

The sweets table included this Fabulous Cake,
Cupcakes, Painters Palette Cookies, Colorful Gumballs,
Crayola Jelly Bellies, and last but not least..
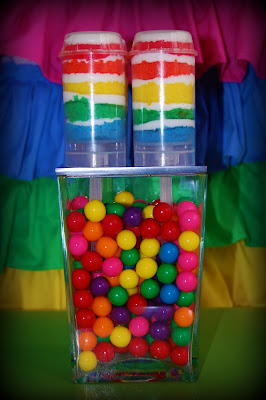
Rainbow Cake Push Cakes!


The kids all made their own gumball masterpiece
to take home with them.


I had so much fun making the push cakes!
I had a little snag with the box displays
and had to serve them upside down,
but hey...it worked.

If you are looking for a tutorial to make you own
push ups head over to this post:
Rainbow Push Up Tutorial and Recipe
Looking for your own push ups?
You can find them here:
Simply Creative Printables


The kids loaded up their Art Cubby with Sand Art,
Paintings, Gumballs, and this fun little favor!

The favors were 4 small containers with
colorful playdoh in each. I tied them up with
some twine and included a mini polling pin,
and heart shaped cookie cutter on top!


I had so much fun planning this fun and colorful party
for my daughter!
Art is such a fun activity for little ones!

Needing to plan your own Art Party?
Here is a list of useful Vendors to help:

Party Printables:  Simply Creative Printables
Push Up Containers:  Simply Creative Printables
Gable Boxes:  Container Store
Birthday Shirt:  Modern Frills
Stripped Lunch Bags:  Sweet Shop Lulu
Kandy Kones:  Posh Party Pretties

Thursday, May 26, 2011

Pie in a Jar with Free Patriotic Tags...Yes, Please!

I have been wanting to make those cute little pies
in mason jars since I saw them way back when!

Well, I finally got around to making them!
You have to try these!
They are super easy and have a big impact
when you attach a cute little label!


What do you think?
Want to make you own?

Here are the recipes and directions!


Basic Pie Crust Recipe:

2 cups Flour
1/4 tsp of Salt
11 Tbls of Butter
4 to 5 Tbls of cold water


1. Measure flour and salt into a bowl.
Cut cold butter (straight from fridge) into small chunks
and throw on top of the flour.

2.   Cut the butter into the flour.
Until butter is in small crumbly pieces.

3.  Add ice water a tablespoon at a time
while stirring dough mixture with a fork

4.  Bring it all together and pat into a ball.
 Wrap in plastic and put it in the fridge.
Next for the Fruit:

2 C prepared fruit (pitted, diced, peeled, etc.)
2 T sugar- brown or white
2 T flour
1 T butter (divided between the pies)
Seasonings/flavorings- cinnamon, nutmeg, vanilla and almond extract, citrus zest etc)

I used red delicious apples for this recipe.
Sprinkle flour over fruit.
Add  brown sugar to taste, up to 1/2 cup.
Mix it all up.

Next Make a Topper and Line the jar:


Roll out a small handful of dough.
This is just for the tops of your pies.
Grab the ring part of your jar and use that as your cookie cutter.
Cut the tops and set them aside.

Now the fun begins:  Assembly!!

1.  Start pressing the dough into the jars. 
Start from the bottom and work your way until you
almost reach the top of the rim.

2.  Add 1/2 cup fruit filling

3. Add the Circle Toppers to the the pie

4.  Press with a fork to seal the edges. (sorry no pictures)

5.  Brush the tops with butter and sugar.

I used Maple Sugar I bought at Williams Sonoma!  It is so good! 
You have to try this stuff!
I put it in my coffee....ok, ok, I digress...


Now, you can either freeze these lovilies for another day,
or you can bake them up now

If frozen, cook at 375 for 50 to 60 minutes or to cook immediately for 45.
I cooked mine for exactly 45 minutes and they were perfect!!

Now, who wants some free tags to go along with these yummies?


Just send me an email at
and tell me what kind of pie you are making!
You will get
Cherry Pie Labels
Apple Pie Labels
And Matching Favor tags that say "Enjoy"

Happy Baking!

Thursday, April 14, 2011

New "FREE" Easter Printables

I was contacted last week by the very sweet Toni

She is a fabulous Military Mom who wanted to do
something special for all of her military familes
serving our country.

I was extremely happy to put something special together
to help our Military familes with Easter.
I designed a new set of Easter Printables
to share with all of those families!

Now they are your's for free as well!
All you have to do is contact me
via email at bcramer485@sbcglobal.net
to get your own copy!!
Have a fabulous Easter!

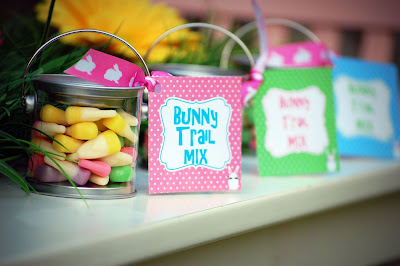
Bunny Trail Mix
Favor Tags


Straw Flags


2 Inch Circles

Cupcake Toppers, Drink Tags, Napkin Rings and More


Happy Easter Banner


Happy Easter!


Pin it!