Showing posts with label recipes. Show all posts

Monday, September 12, 2011

Breakfast Push Ups


I have really been loving all of the fun ideas
I find over at Pinterst!

If you have not been able to visit their site
Go NOW!!
RUN!!!

Okay, Okay....I found this sweet new use
for the push up containers that you can
find here!

Cinnamon Roll Push ups!


I never thought to do breakfast!

Find the Tutorial for these over
at Tip Junkie....Another great site!
Also, if you are looking for these little containers,
I have them in my shop!

Here is a BONUS!
With every order in September and October,
I am giving you a set of
Halloween Printable Party Circles FREE!


Just mention you saw this on my blog!


Thursday, September 1, 2011

Banana Split Truffles!!

This has to be the cutest little thing I have seen
in the sweets world in a while!

Check this out!
Banana Split Truffles

 Banana Split Truffles are banana-flavored white chocolate truffles!
They are decorated to look like a tiny scoop of ice cream! 
YUMMY!
Find the recipe here! 

Wednesday, August 17, 2011

Good Idea: Coffee Cubes

It has been one hot summer here in Texas!
Iced coffee has been a favorite of mine this summer!
Making Iced coffee at home can be fun!

Instead of pouring that last little bit of coffee
down the drain, save it and make cubes out of it!
This works great for tea as well!

Just empty your cooled left over coffee or tea into
an ice cube tray and freeze!
Simple as that!

Now if you are like me and like to do things
a little different, try using different ice molds!

Checkout these coffee bean ice molds!
How fun!


You can find these fun molds at Perpetual Kid.

Sunday, August 7, 2011

Rainbow Push Pop Cakes Tutorial

Good Monday Morning!
I have a fun and tasty treat for you today
with all of the instructions to make them
yourselves!

Remember the Rainbow Push Pop Cakes
I made for my daughters Art Party here?


I am here to show to make your own!

Rainbow Push Pop Cakes

Materials:

2 boxes of White cake mix
3-4 cans of white frosting Or if you can make your own buttercream...
Go for it!
All the eggs, oil & water necessary to make the cake mix
Food coloring
Five 9″ round cake pans
5 bowls
Oil & Flour


Directions:

1. Preheat the oven to 350 degrees.
2. Oil & flour your two pans.
2. Mix up the two white cakes in your electric mixer using the directions on the box.


3. Divide the cake mix evenly into 5 bowls.
For me that was about 1 1/2 cups plus about 1/3 cups of batter in each bowl.


4. Using your food coloring, dye each bowl a different color.
I started with 2 drops of color in each bowl.
You can always add more to darken.
I recommend Williams Sonoma Food Coloring paste.


5. Bake your layers.
I bake 2 pans at a time for 13 minutes.
Baking times will vary per oven.
Remember these are thinner and require less time
than a normal cake.

6. Let the cake cool before assembly.

7.  I like to place the cakes in the refrigerator
to make them easier to cut the circles
without crumbs going everywhere.

Assembly:

(Click on picture to enlarge)

1.  Assemble the push up containers
(If you need them, you can find them here)

2. Use the push up containers open end to cut
circles in your cake. 
(You can do this with the cakes still in the pans)

3.  Cut 1 circle in each colored cake

4.  If your cakes didn't cook evenly you
might have the cut the circles in half to
make them smaller.

5.  Assemble them in the order of
colors you like the best.
I did Blue, Green, Yellow, Orange, Red

6. Place the BlueCake in the bottom of the push up.
(It makes it easier to push the stick up
the container and then place the cake inside)
***Note****
Only raise the stick on the first layer.

7.  Push the cake down to the bottom with your finger tips
 and add frosting.
Use plenty of frosting so it fills the container.
And makes it extra yummy.:)

8.  Keep layering cake and frosting until your container is full.

It take a couple of tries to get the hang of it but, I promise it is
super easy and kids and adults will love them!!

**One of my biggest tips is to use a good amount of frosting between the layers.
You can see in my picture that the layer between the Blue and the Green
looks the best.  That is because I used more frosting. 
You need to almost cover the cake completely to make sure you have enough.

Happy Baking!!

Monday, July 4, 2011

Happy July 4th!

I hope you all have a wonderful day
spent with your families and friends!
We are having a blast with friends
on the beaches of Destin!

Hope you got a chance to print your
July 4th designs.
If not, get yours in the scribd box on
the right hand side of my blog.

Now, on with the cocktails!


Yankee Doodle


1 part UV Blue Raspberry-flavored vodka
2 parts sour mix
1 part tonic water

Combine ingredients and serve in a rocks glass over ice.
For a non-alcoholic version of this drink,
 substitute raspberry-flavored fruit juice for the vodka.

Patriotic Punch
1 part UV Red Cherry-flavored vodka
3 parts lemonade

Combine ingredients and serve in a rocks glass over ice.
 For a non-alcoholic version of this drink
, substitute cherry-flavored fruit juice for the vodka.
 This is a great recipe either by the pitcher or by the punch bowl.
Add some red and black raspberries or even blueberries
to the punch bowl to make it even more patriotic!

Stars and Stripes Forever

1 oz. UV Blue Raspberry Vodka
2 oz. sour mix
Fill the glass the rest of the way with lemonade
Top off with a cherry

For a non-alcoholic version of this cocktail,
 substitute raspberry-flavored fruit juice for vodka.

The Patriot
 (aka a not so Shirley, Shirley Temple)

1 oz. UV Red Cherry Vodka
Fill the glass the rest of the way with 7-Up
Garnish with orange slices

For a non-alcoholic version of this drink,
substitute cherry-flavored fruit juice for vodka.
For a great punch bowl idea,
 also add in a little champagne and garnish with
 strawberries and blueberries!

Tuesday, June 21, 2011

Grown Up Ice Cream Sandwiches

I just love the cool and tasty treat that
an Ice Cream Sandwich gives us in the summer!

With so many combinations of flavors
and cookies...there is an endless
amount of choices!

So, why not kick it up a notch with
Adult Ice Cream Sandwiches!!

Love the color!


Baileys in the Ice Cream
Kahlua and coffee in the Brownie mix!


This one is just pretty!


Which one are you going to try?
I want them all!

Monday, June 13, 2011

Smorestini...Yes!

Ok, I have to admit I have been a bad blogger!
I am really having a hard time finding balance since
school is out for the summer!
Anyone else?
It is like I am on Summer Vacation too!

So, with that...I am sharing a cocktail that
is fun and would be great for the 4th of July
and to celebrate my Dallas Mavericks
winning their first NBA title!
Yeah!!!


Smores Martini
*Recipe courtesy of evite.com


Served rimmed with
graham cracker and marshmallow creme...Yum!!!

Ingredients:

•1 ounces vodka
•16 ounces chocolate liqueur
•1 64- ounce pitcher
•1 graham cracker
•1 jar marshmallow creme
•16 martini glasses 
•1 bag wooden skewers
•1 bag miniature marshmallows

Directions:

•Pour vodka and chocolate liqueur into pitcher and stir.
Refrigerate for at least several hours until the mixture is very cold.

•Crush a graham cracker in a plastic bag, then pour the crumbs into a small bowl.

•Dip a finger into the jar of marshmallow creme,
 then run it around the rims of your martini glasses to lightly coat.
 Next, dip each glass into the bowl of graham cracker crumbs and
shake the bowl gently to cover the marshmallow creme with crumbs.
•If you have a grill going (or even better, a fire pit or chimney),
offer each guest a wooden skewer and three mini marshmallows to toast over the flame
(put the grill on high for the best browning).
 Note: Although the skewer package may advise soaking the skewers
 in water for at least 20 minutes, it's not necessary for this recipe.

•Pour about 3 ounces of the drink mixture into each of the prepared glasses and serve,
letting each guest slide their roasted marshmallows into their drink for garnish

Make you own drink garnish....
How fun is that?

Thursday, May 26, 2011

Pie in a Jar with Free Patriotic Tags...Yes, Please!

I have been wanting to make those cute little pies
in mason jars since I saw them way back when!

Well, I finally got around to making them!
You have to try these!
They are super easy and have a big impact
when you attach a cute little label!


What do you think?
Want to make you own?

Here are the recipes and directions!


Basic Pie Crust Recipe:

2 cups Flour
1/4 tsp of Salt
11 Tbls of Butter
4 to 5 Tbls of cold water


1. Measure flour and salt into a bowl.
Cut cold butter (straight from fridge) into small chunks
and throw on top of the flour.

2.   Cut the butter into the flour.
Until butter is in small crumbly pieces.

3.  Add ice water a tablespoon at a time
while stirring dough mixture with a fork

4.  Bring it all together and pat into a ball.
 Wrap in plastic and put it in the fridge.
Next for the Fruit:

2 C prepared fruit (pitted, diced, peeled, etc.)
2 T sugar- brown or white
2 T flour
1 T butter (divided between the pies)
Seasonings/flavorings- cinnamon, nutmeg, vanilla and almond extract, citrus zest etc)

I used red delicious apples for this recipe.
Sprinkle flour over fruit.
Add  brown sugar to taste, up to 1/2 cup.
Mix it all up.

Next Make a Topper and Line the jar:


Roll out a small handful of dough.
This is just for the tops of your pies.
Grab the ring part of your jar and use that as your cookie cutter.
Cut the tops and set them aside.

Now the fun begins:  Assembly!!

1.  Start pressing the dough into the jars. 
Start from the bottom and work your way until you
almost reach the top of the rim.

2.  Add 1/2 cup fruit filling

3. Add the Circle Toppers to the the pie

4.  Press with a fork to seal the edges. (sorry no pictures)

5.  Brush the tops with butter and sugar.

I used Maple Sugar I bought at Williams Sonoma!  It is so good! 
You have to try this stuff!
I put it in my coffee....ok, ok, I digress...


Now, you can either freeze these lovilies for another day,
or you can bake them up now

If frozen, cook at 375 for 50 to 60 minutes or to cook immediately for 45.
I cooked mine for exactly 45 minutes and they were perfect!!

Now, who wants some free tags to go along with these yummies?


Just send me an email at
and tell me what kind of pie you are making!
You will get
Cherry Pie Labels
Apple Pie Labels
And Matching Favor tags that say "Enjoy"

Happy Baking!

Monday, May 23, 2011

Yum Alert! Pizza on a Stick!

Well, I am not sure about you but,
I love to see creative ways to display and serve food!

I also love skewers and I love pizza!
So, what do you get when you put the two together?

A seriously cute, and yummy treat!!!

I would love...ummm...I mean,
my KIDS would love these...
and I guess mom too!


Get all of the instructions for these lovelies here!

Friday, April 22, 2011

Cookie Dough Fruit Tartlet

I love love fruit Tartlets!
Check out this spin on the classic..
Using Cookie dough.

These would make a great addition to
you Easter dessert table.


Yummy!

YIELD: 48 tartlets
PREP TIME:30 MINUTES
CHILL:2 HOURS
BAKE:12 MINUTES
COST PER SERVING:$.47

Ingredients
Cookies:

2 cups all-purpose flour
1/2 teaspoon baking powder
1/4 teaspoon salt
8 tablespoons (1 stick) unsalted butter, softened
1 cup sugar
1 large egg plus 1 large egg yolk
1/2 teaspoon vanilla extract

Topping:


1 cup heavy cream
1/4 cup sugar
1 11-oz. jar lemon curd
2 pints assorted fruit, such as blueberries, strawberries,
raspberries and kiwifruit
1/2 cup apricot jam

Preparation:

1. Make cookies: Mix flour, baking powder and salt. Beat butter and sugar until light, 2 minutes. Beat in egg, yolk and vanilla. Stir in flour mixture. Knead into a ball. Divide in half; form into disks. Wrap each in plastic; chill for 2 hours.

2. Preheat oven to 350°F. Line 2 large baking sheets with parchment. Roll out dough on a lightly floured surface to 1/8-inch thickness. Cut into 2-inch rounds. Transfer to baking sheets; leave 1 inch between cookies. Gather scraps, re-roll and cut out more circles. Repeat with second disk. Bake cookies until edges are golden, 12 minutes. Let cool.

3. Make topping: Beat cream with sugar until stiff peaks form. Stir 1/3 of whipped cream into lemon curd to lighten. Fold in remaining whipped cream. Keep chilled. Just before serving, top each cookie with a teaspoonful of lemon mixture. Divide fruit among tarts.

4. Melt jam in a pan over medium heat. Add 1 Tbsp. water; stir until liquid. Strain. Dab apricot mixture over fruit.

(Recipe and photo via My Recipes)

Friday, March 25, 2011

Champagne Please!

Happy Friday!
What a fantastic week!
I think I will celebrate right into
the weekend with this!

Strawberry Champagne Punch


YOU'LL NEED
Yield: 12 serving

1 liter sparkling champagne
1¼ cups fruit punch
1¼ cups ginger ale
1¼ cups orange juice
1 pint fresh strawberries
1 pint raspberry sherbet
1 pint vanilla ice cream


Instructions
Chill juices and sodas before using.
Mix juices, soda and wine in punch bowl.
Add strawberries and stir.
Spoon in ice-cream and sherbet, mixing.
Add ice ball preferably made of frozen punch.
Garnish with strawberries, kiwi, orange slice!

This would be a fun to serve for Easter!
Dessert and champagne all at once!

Giveaway:
You have until Sunday night to enter!
Big winner announcement on Monday!!

Thursday, March 3, 2011

Play with your Food!

Want to get your kiddos in the kitchen
for breakfast?

This would wake up my kids in a second!
Not only do they love pancakes....yummy!

But, these are not your ordinary pancakes!

Check this out!


Made by father who quest
is to make fun pancakes
for his sweet children
Check him out here at
Jim's Pancakes!

He is amazing!

Friday, January 7, 2011

Cocktail Friday: Blueberry Lime Margarita

Yummy!
Try this twist on the old
margarita recipe!

Blueberry-Lime Margarita

(Recipe and photo from Shine)
Ingredients:

2 cups ice
1 cup frozen blueberries
1 cup blueberry nectar
1/4 cup seltzer
2 tablespoons frozen limeade
1 tablespoon lime juice
3 ounces tequila, optional
1 lime wedge
Coarse salt

Directions
Combine ice, blueberries, blueberry nectar,
seltzer, limeade, lime juice and tequila,
in a blender and blend until smooth.
Rub rim of 2 glasses with lime wedge and dip in salt.
Divide the margarita between 2 prepared glasses and serve.
Have a Fantastic Weekend!

Thursday, January 6, 2011

I'll have one please....

...or maybe 2!
I love the idea of setting up
speciality cocktail bars for parties!
Try this one out at your next brunch!
Make your own Bloody Mary's!


This eye catching bar was set up by

I have a serious crush on this table!
From the over sized colored and clear
containers, to the turquoise pepper mill,
to the beautiful vegetable skewers!

Aw....love at first site!

You want one of those pepper mills don't ya?
Check out all of the details of the ingredients
they used here!

Thursday, December 30, 2010

NYE Ball Drop Cupcakes

Oh my goodness!
Have you seen these yet?

made these adorable cupcakes!


They are absolutely genius, brilliant,
adorable and best of all edible!

What a perfect idea!
So playful and festive!
I wish I could whip some up!

Wednesday, November 17, 2010

Twice Baked Sweet Potates

I was watching one of my favorite chef's
on the Food Network, Bobby Flay,
this week and I saw something so delish
I had to share!

Twice Baked Sweet Potatoes


(photo by Kraft)

Here is what you will need:

4 large sweet potatoes, scrubbed
1 1/2 cups heavy cream
1 tablespoon chipotle peppers in adobo, pureed
1 stick unsalted butter, softened
1/4 cup creme fraiche
1/2 cup maple syrup, plus 2 tablespoons
Salt and freshly ground pepper
Nonstick cooking spray

Get all of the directions here.

I love his recipes because he always
adds a little southwest flare!
Can't wait to taste these with that
little kick of chipotle pepper flavor!

Tuesday, October 5, 2010

Carmel Puffs

I was looking for something easy and sweet
and I think I have found it!
No baking necessary!

Carmel Puffs
Sweet, Salty, Carmel, and Chocolate!
What's not to like?


Dip marshmallows halfway into the warm caramel.
Let the excess drip off, then dip in crushed pretzels
Place on a lightly oiled parchment-lined baking sheet until set.
Drizzle with melted chocolate.


Recipe from the Food Network
Photograph by Karl Juengel

Monday, September 6, 2010

Celebrate with Pie

Happy Labor Day!
Hope everyone is enjoying their time off
and spending time with family.
We have had a great weekend.
I will be spending my morning with my girls
in the kitchen making these pocket pies for a BBQ tonight.
My girls are so excited!
They love making these....
I think it reminds them of cutting sugar cookies.
They are so easy to make and everything
is sweeter in smaller packages!
All you need is this tool!

Find them at your local Williams Sonoma stores.
Follow this link for a video instruction.
Enjoy!

Friday, September 3, 2010

Tailgate Friday!

It's the most Wonderful Time of the Year....
no not Christmas yet...FOOTBALL!
I love college football and I am ready to
kick things off tomorrow.

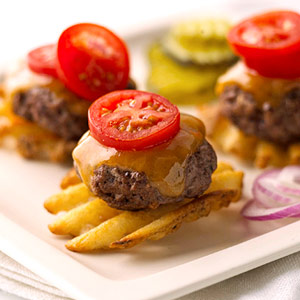
Here is a very cool presentation for
the old burgers and fries.
Why not serve them together?


This is all you need:

16 large frozen French-fried waffle-cut potatoes (1/3 of a 22-oz. pkg.)
1 lb. ground beef or turkey
2 to 3 tsp. grilling seasoning blend
4 slices cheddar cheese, cut into quarters (4 oz.)
4 cherry tomatoes, sliced
Mustard, ketchup, dairy sour cream, and/or dill pickle slices


Find all of the directions here at
BHG.

Thursday, August 26, 2010

Sweet and Spicy

Well, I am having one of those weeks!
School has started and my engine
was running at full spead on Monday but
it is now slowly leaking oil!
I am spent!
I think today calls for a cocktail!
That right, I said it out loud...
I am starting the weekend early!

Check out this "Hot Lips" Chocotini
Created by Kara Newman,
author of "Spice & Ice - 60 Tongue Tingling Cocktails"
1/2 red chile pepper, sliced
1 ounce Van Gogh Dutch Chocolate vodka
1 ounce Kahlua
1/2 ounce Luxardo Maraschino liqueur
Fresh cream
Chocolate

In a cocktail shaker, muddle the sliced chile pepper.
Add the Van Gogh Dutch Chocolate Vodka, Kahlua, and Luxardo.
Shake together with ice and strain into a small martini glass.
Next, gently pour cream over the back of a spoon
to create a "float" on the top of the drink.
Use a hand grater for a generous amount of
chocolate shavings on the top of the drink.

Optional garnish:
1 whole red chile pepper
1 oz. chocolate, melted

Dip 3/4 of the chile pepper into melted chocolate.
Set on wax paper and put in refrigerator until chocolate hardens.
Cut a slit in the upper portion of the chile pepper
so it will sit neatly on the rim of the glass.

This is going to set me free!

Pin it!