Showing posts with label childrens birthday. Show all posts

Thursday, April 18, 2013

Fathers Day Printable and Treat


Who needs a fun idea for Father's day?

I know, I know....Mother's Day is coming first!
But, I know what I am doing for my sweet Mother
so, I have moved on to Father's Day!

My girls and I came up with this fun printable
and made some homemade chocolates with this
fun mustache mold!

What do you think?
I think it turned out pretty cute!


You can find the printables here in my Etsy shop!

Monday, September 12, 2011

Breakfast Push Ups


I have really been loving all of the fun ideas
I find over at Pinterst!

If you have not been able to visit their site
Go NOW!!
RUN!!!

Okay, Okay....I found this sweet new use
for the push up containers that you can
find here!

Cinnamon Roll Push ups!


I never thought to do breakfast!

Find the Tutorial for these over
at Tip Junkie....Another great site!
Also, if you are looking for these little containers,
I have them in my shop!

Here is a BONUS!
With every order in September and October,
I am giving you a set of
Halloween Printable Party Circles FREE!


Just mention you saw this on my blog!


Monday, August 15, 2011

DIY Stars in Jars

Well, summer is winding down and school is starting
for us next week. 
I was looking through Pinterest last night
for hours...and hours....loving all of the beautiful
and fun ideas and came across this project.

Stars in Jars!


What you need:
Mason Jars
Glow in the Dark Paint
Wooden sticks or small paint brushes

What to do:
Dip your stick or brush in the paint
Splatter inside the jar

That is all!
This would be so fun for my kids rooms
or for a sleep over party craft!

Sunday, August 7, 2011

Rainbow Push Pop Cakes Tutorial

Good Monday Morning!
I have a fun and tasty treat for you today
with all of the instructions to make them
yourselves!

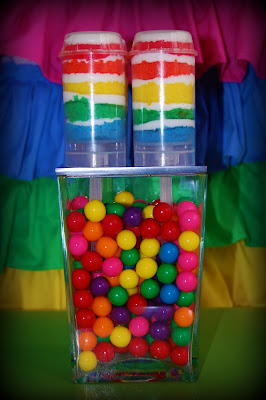
Remember the Rainbow Push Pop Cakes
I made for my daughters Art Party here?


I am here to show to make your own!

Rainbow Push Pop Cakes

Materials:

2 boxes of White cake mix
3-4 cans of white frosting Or if you can make your own buttercream...
Go for it!
All the eggs, oil & water necessary to make the cake mix
Food coloring
Five 9″ round cake pans
5 bowls
Oil & Flour


Directions:

1. Preheat the oven to 350 degrees.
2. Oil & flour your two pans.
2. Mix up the two white cakes in your electric mixer using the directions on the box.


3. Divide the cake mix evenly into 5 bowls.
For me that was about 1 1/2 cups plus about 1/3 cups of batter in each bowl.


4. Using your food coloring, dye each bowl a different color.
I started with 2 drops of color in each bowl.
You can always add more to darken.
I recommend Williams Sonoma Food Coloring paste.


5. Bake your layers.
I bake 2 pans at a time for 13 minutes.
Baking times will vary per oven.
Remember these are thinner and require less time
than a normal cake.

6. Let the cake cool before assembly.

7.  I like to place the cakes in the refrigerator
to make them easier to cut the circles
without crumbs going everywhere.

Assembly:

(Click on picture to enlarge)

1.  Assemble the push up containers
(If you need them, you can find them here)

2. Use the push up containers open end to cut
circles in your cake. 
(You can do this with the cakes still in the pans)

3.  Cut 1 circle in each colored cake

4.  If your cakes didn't cook evenly you
might have the cut the circles in half to
make them smaller.

5.  Assemble them in the order of
colors you like the best.
I did Blue, Green, Yellow, Orange, Red

6. Place the BlueCake in the bottom of the push up.
(It makes it easier to push the stick up
the container and then place the cake inside)
***Note****
Only raise the stick on the first layer.

7.  Push the cake down to the bottom with your finger tips
 and add frosting.
Use plenty of frosting so it fills the container.
And makes it extra yummy.:)

8.  Keep layering cake and frosting until your container is full.

It take a couple of tries to get the hang of it but, I promise it is
super easy and kids and adults will love them!!

**One of my biggest tips is to use a good amount of frosting between the layers.
You can see in my picture that the layer between the Blue and the Green
looks the best.  That is because I used more frosting. 
You need to almost cover the cake completely to make sure you have enough.

Happy Baking!!

Wednesday, July 13, 2011

Balloon Wreath Tutorial

Oh Happy Day!
My Little Art Party was featured over


I am so excited!! What? 
Excited is not even the word!
I really have no words to describe
how over the moon I am!

Well, I have had a few people write and ask
about how to make these very fun
balloon wreaths.

They are so easy you are not going to believe it!

So here are the instructions that I used

What do you need:


You need balloons. Lots and lots of balloons.
I used 3 bags of 72 count variety colored balloons.
 2 greening pin packs-
found at Craft stores in the artificial plant section

 Straw wreath
Important: leave the plastic on so it doesn’t shed.

What to Do:

You just take a greening pin, stick the balloon in the middle…


and stick it to the straw wreath......


Do this over and over and over until the whole wreath
 is filled in colorful balloons!


There you go!
Finished Product!


It is that simple!
For more fun projects visit

Warning:
You might lose yourself for hours!!

Monday, June 27, 2011

Real Parties: U-Pick Hydroponic Party

I recently received an email from Stacey at
Elle Belle Blog with a fabulous party
she threw for her precious little girl!

I love to see new theme ideas...
this is so fun!
Stacey was fortunate to discovered a local hydroponic
U-Pick Farm, called First Fruits.
What a great discovery!
They have been picking fresh food there months!
Birthday girl Elle loves picking fruit so
she thought it would be a great
place for a birthday party!

The party was in a Morning Breakfast
since Florida heats up in the afternoon!
Something I am familiar with in Texas!!
So I totally get it!

Check out the beautiful details...


Love the outdoor organic farm feel...


Place setting...looks like a plant right?
No...think again!
They are chocolate pudding, Oreo "dirt", mint leaf "plants".
She added a wood spoon/plant stake and stamped "yummy"!
Cute!!


Love the over turned pots as stools!
So cute!


Morning Breakfast menu...
Muffins, Juice, Fruit and Coffee...Yum


Love these...
Keep Calm and Buy Local
Coffee Cup Wrappers

Stacey's husband carefully folded and cut these lovelies...
wow.....what a great daddy!


Children's aprons....so vintage and sweet!


Stacey even made a sweet little favor for the parents too...
Quilted mason jar of fruit dip
 topped with handmade labels with little
 felt strawberries from Mud & Twig.
A wooden spoon stamped with "thanks" tied on with twine
completed the favors.


Thank Stacey for sharing with us!
If you haven't been to see Stacey's blog,
find it here!
Lots of fun stuff!

Friday, June 17, 2011

Pocket Full of Sunshine

This is one way to start off the weekend!
Check out this bright and fun party!
I knew I had to share when I saw this
over at Love The Day.
All of the details were captured by


Sweet Birthday Girl....


I love this sunshine backdrop and ruffled tableskirt!


Sunshiney foods...Love the donuts on sticks!


Turquoise drink station and gifts table...


Ribbon backed chairs....precious!


Turquoise High Chair is so sweet!
What a lovely detail to hang a banner on the chair!


Have a Happy Sunshiney Weekend!

Wednesday, June 1, 2011

Picasso Art Party!

My sweet little girl turned 4 last week and
had been talking about an Art Party for months!

It was the first time to invite classmates over
to her house for a party and she was beaming
with excitement!

I have so many pictures so bare with me
in this super size of a feature!

The little artist were greeted by a
birthday balloon wreath!
So super easy!  You must make one! 


And my Sweet Birthday Girl!
Don't you love that shirt!
The ever fabulous Kristina at Modern Frills never disappoints! 
 They are great shirts! 


The first task for my Mini Picasso's
were to make Picasso Pops!
My daughter's help me smash up colorful candies
and place them into bowls divided by colors.
Each guest made their own lollipops!


I wish I had pictures of the finished product...
however I had my hands full!
(Note to self:  Hire a Photographer!)

After making their Picasso Pops,
each little artist found their art supplies
in the Art Cubby that I set up.


Next, my little artists were off for a little
sand art fun!


After finishing their sand art, they painted
their own Picasso Masterpiece.
The kids were so creative! 
Who needs a little treat?
The kids had a little snack with painting
from these fabulous Kandy Kones


Starving Artist?
Yes, after all of that hard work, it was time to eat!

I kept the table design simple.
A row of colorful pails with matching pinwheels lined the table.
I cut the place mats out of colorful foam sheets
and added the dots to make a painters palette.


I tied up the gable boxes with a tag that
read "Starving Artist" and attached a paint brush
for a little added touch.


After all of that fun and lunch....
it is time for some sweets right?


Raibow Lantern hung above the Sweets Table...


I knew I had to have this ruffled table skirt as soon as
my daughter said "Art Party"!

The sweets table included this Fabulous Cake,
Cupcakes, Painters Palette Cookies, Colorful Gumballs,
Crayola Jelly Bellies, and last but not least..
Rainbow Cake Push Cakes!


The kids all made their own gumball masterpiece
to take home with them.


I had so much fun making the push cakes!
I had a little snag with the box displays
and had to serve them upside down,
but hey...it worked.

If you are looking for a tutorial to make you own
push ups head over to this post:
Rainbow Push Up Tutorial and Recipe
Looking for your own push ups?
You can find them here:
Simply Creative Printables


The kids loaded up their Art Cubby with Sand Art,
Paintings, Gumballs, and this fun little favor!

The favors were 4 small containers with
colorful playdoh in each. I tied them up with
some twine and included a mini polling pin,
and heart shaped cookie cutter on top!


I had so much fun planning this fun and colorful party
for my daughter!
Art is such a fun activity for little ones!

Needing to plan your own Art Party?
Here is a list of useful Vendors to help:

Party Printables:  Simply Creative Printables
Push Up Containers:  Simply Creative Printables
Gable Boxes:  Container Store
Birthday Shirt:  Modern Frills
Stripped Lunch Bags:  Sweet Shop Lulu
Kandy Kones:  Posh Party Pretties

Pin it!